This is the first of a series of articles exploring lots of different rendering and state management techniques for vanilla JavaScript. I’m not necessarily saying, “these are the best possible ways of doing this.” I’m only saying, “this is a way that works and might make a good solution for your use case.” Along the way, I’ll try and discuss some of the inner-workings of JavaScript that make this all “tick”, so to say.
Local Reactive State
I think that one missing feature that I see a lot of engineers try to recreate on websites that aren’t using Vue, React, or any other frontend framework, is reactivity. It is really productive when you can easily create variables that your UI instantly reacts to changes of. When I work with framework-less JavaScript, I often find that engineers go really far out of their way to manage state for components. I’ve seen a lot of ways of doing it, but I want to demonstrate a pure JavaScript way of doing it.
What do we want?
Let’s take a look at the ubiquitous React state example: the counter. It’s a very simple demonstration of local reactive state. You assign a variable as a state variable. Then on changes to that variable, the UI will re-render.
function counter() {
	let [count, setCount] = useState(0)

	console.log("render")

	return (
		<><button onClick={()=> {setCount(count++)}}>{count}</button><>
	)
}
However, React works in a particular way. When it re-renders the component, it re-renders the entire thing. It is a consequence of it’s virtual DOM and how React works. We don’t have to do that because we are using a static website and have more direct control over rendering.
The setup
For these tutorials, I’ll use the Astro framework. If you’re unfamiliar with Astro, it’s a great framework for generating static websites. It can do a lot more than that, but we’re not here to talk about my love for Astro. I used the setup with demo content and TypeScript.
npm create astro@latestFamiliarize yourself if you need to. Astro isn’t really that complicated to understand. You’ll catch on quickly. The important thing to remember with Astro is that there is no client-side rendering. Therefore, you’ll see client-side logic written in script HTML blocks.
Go ahead and add a new page.
---
import Layout from "../layouts/Layout.astro";
import Counter from "../components/Counter.astro";
import CounterWatcher from "../components/CounterWatcher.astro";
---

<!-- // pages/index.astro -->
<Layout title="State Management">
  <main>
    <button class="counter">0</button>
  </main>

  <script>
    function useState<T>(
      initialValue: T,
      afterUpdate: () => void = () => {},
      beforeUpdate: () => void = () => {},
    ) {
      let hook = {
        value: initialValue,
        set(newValue: T) {
          beforeUpdate();
          hook.value = newValue;
          afterUpdate();
        },
      };

      return hook;
    }

    function hydrateCounter(counter: HTMLButtonElement) {
      const count = useState(0, () => {
        counter.textContent = `${count.value}`;
      });

      counter.addEventListener("click", () => {
        count.set(count.value + 1);
      });
    }

    const counters: NodeListOf<HTMLButtonElement> =
      document.querySelectorAll(".counter");

    counters.forEach((counter) => {
      hydrateCounter(counter);
    });
  </script>
</Layout>
Let’s talk about how this code works and why.
Code Dissection
The function useState is what we are most interested here. It takes in an initial value, a callback function for after the state updates, and a callback function for before the state changes. While you need a callback of some sort for this particular method, you do not need to necassarily copy how I do it. I like to have a “clean-up” function available just in case, but most of the time, I just use the afterUpdate function.
This function creates a JavaScript object called hook. Now why did we need an object? Why couldn’t the code look more like:
function useState<T>(
  initialValue: T,
  afterUpdate: () => void = () => {},
  beforeUpdate: () => void = () => {},
) {
  let value = initialValue;
  function set(newValue: T) {
    beforeUpdate();
    value = newValue;
    afterUpdate();
  }

  return [value, set];
}
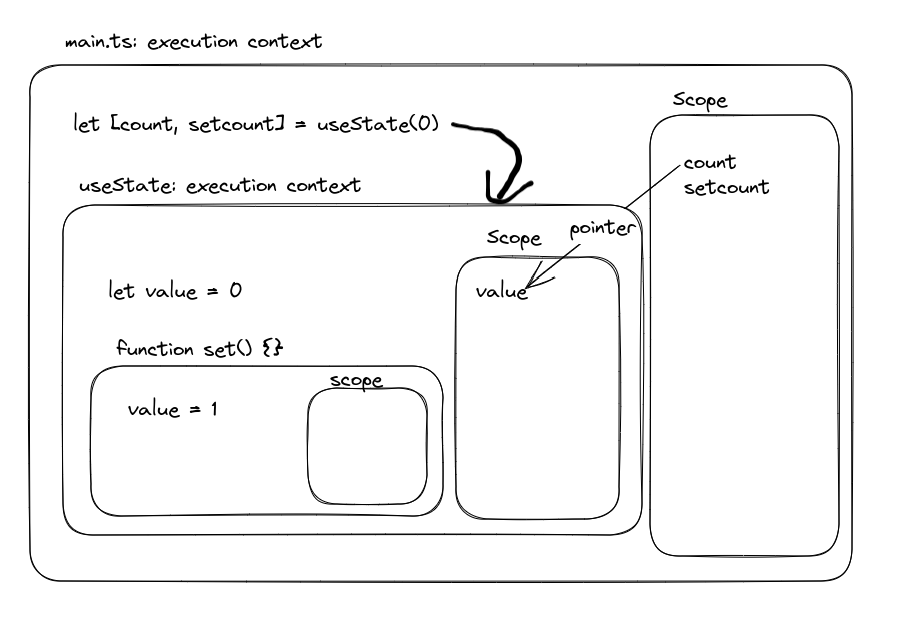
Let’s think about this from JavaScript’s point-of-view:

From this very crude drawing I’ve made, we can see that while count is derived from the value of the useState context, there actually isn’t anything from the set context that rewrites the value in a way that it is saved outside of the set context.
A simpler way to say it is that scope doesn’t go downwards in JavaScript traditionally. Scope only traditionally propagates up the stack.
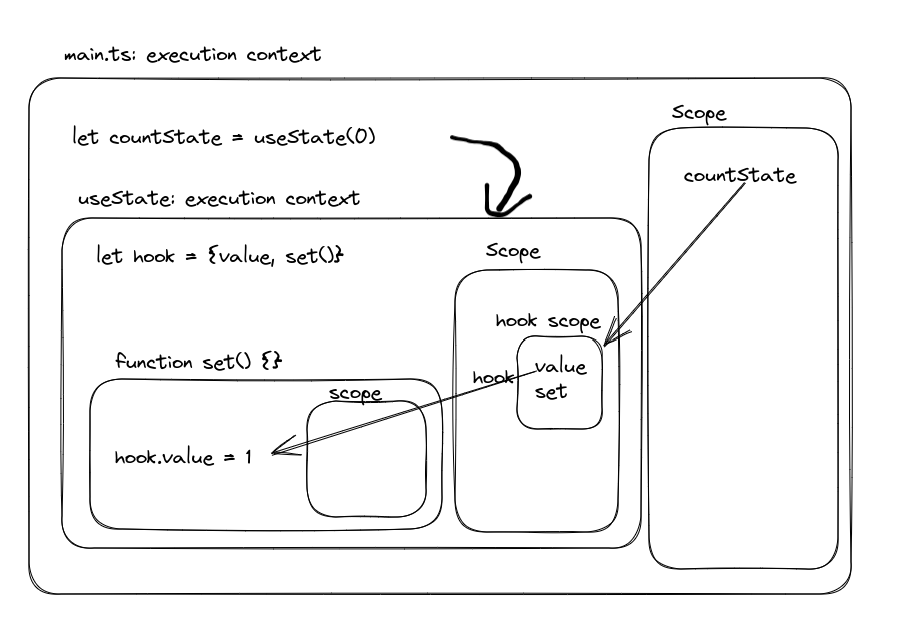
So what makes the object special in JavaScript? An object is more like a pointer. It carries the in-memory addresses of the variables it points to, but doesn’t actually contain the values.

So by using the object, we are really passing around memory addresses for the values we want to change, meaning that they are constant in memory.
“Wait, isn’t that how React works though?”
Well, React, might look like it works that way, but the reality is that under the hood, setState in React is assigning work to the virtual DOM, not really just updating the state in straightforward manner. So when you call setState, you update the variable in the same scope, and then work is assigned to the virtual DOM to update it with a render. The way I am showing state management is more similar to how Svelte and Vue handle it. (And maybe React19 too, I haven’t gotten to see how it works yet.)
Now, you may have noticed one problem: there is no actually initalization of state to reconcile it with the UI. For instance, what if in the HTML we had a ”#” where the 0 is? Wouldn’t we expect as developers that the UI is reflective of the current state?
Or this can be better demonstrated if we add an additional block of code to the counter function:
//...
function hydrateCounter(counter: HTMLButtonElement) {
  const count = useState(0, () => {
    counter.textContent = `${count.value}`;
  });
  const color = useState(false, () => {
    counter.style.backgroundColor = color.value ? "black" : "white";
    counter.style.color = color.value ? "white" : "black";
  });

  counter.addEventListener("click", () => {
    count.set(count.value + 1);
    color.set(!color.value);
  });
}
Now if we run this code, the counter will show with no color until we click it. That isn’t desirable at all with state.
With our current setup, you’re probably thinking to just run the afterUpdate callback before returning the values. However, this won’t actually work:
function useState<T>(
  initialValue: T,
  afterUpdate: () => void = () => {},
  beforeUpdate: () => void = () => {},
) {
  let hook = {
    value: initialValue,
    set(newValue: T) {
      beforeUpdate();
      hook.value = newValue;
      afterUpdate();
    },
  };

  afterUpdate(); // WON'T FUNCTION

  return hook;
}
Our program will complain that our state doesn’t actually exist yet. Which is accurate. The state doesn’t exist until we return the hook object. So what can we do about this?
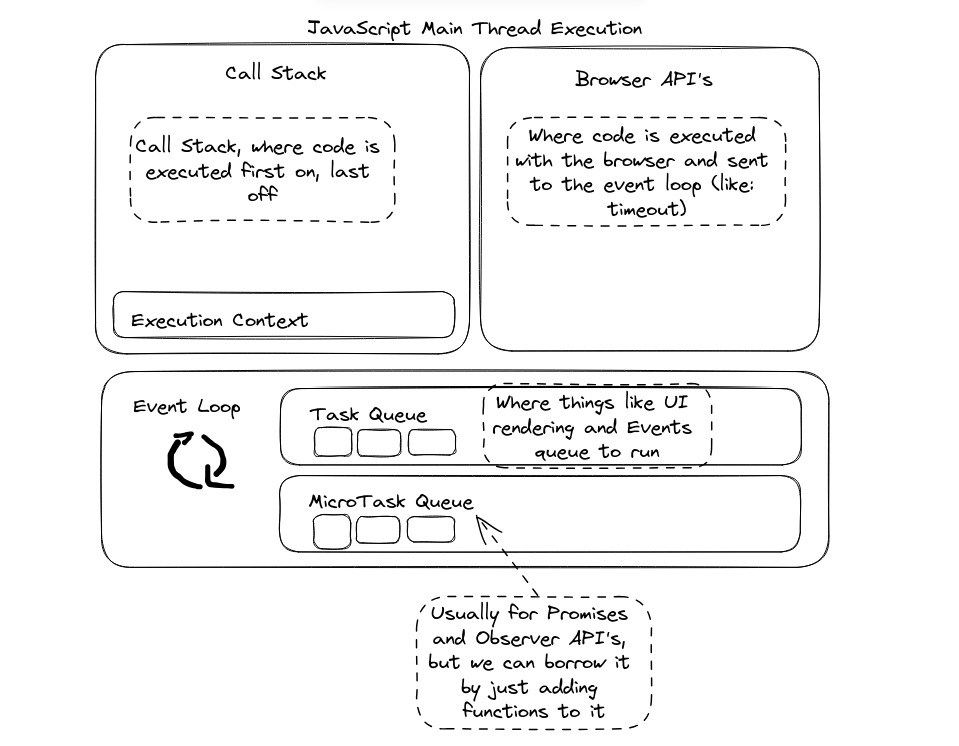
One solution could be that we queue our initial update within the browser microtask queue. This will create a new execution context that will call soon after our function returns but before the user can interact with the page.
function useState<T>(
  initialValue: T,
  afterUpdate: () => void = () => {},
  beforeUpdate: () => void = () => {},
) {
  let hook = {
    value: initialValue,
    set(newValue: T) {
      beforeUpdate();
      hook.value = newValue;
      afterUpdate();
    },
  };

  queueMicrotask(() => {
    hook.set(initialValue);
  });

  return hook;
}
If you are unfamiliar with the microtask queue, it is a separate queue from the task queue on the event loop. We can add execution contexts (functions) to it and have them run. The thing about the microtask queue is that it only runs once the callstack and task queue are empty. Since we aren’t using any blocking code, we should be safe to place a microtask here.

Final “useState” Function
Here is the final “useState” function you could use to create local reactive state:
function useState<T>(
  initialValue: T,
  afterUpdate: () => void = () => {},
  beforeUpdate: () => void = () => {},
) {
  let hook = {
    value: initialValue,
    set(newValue: T) {
      beforeUpdate();
      hook.value = newValue;
      afterUpdate();
    },
  };

  queueMicrotask(() => {
    hook.set(initialValue);
  });

  return hook;
}
Keep in mind however, that a counter in JavaScript could also be built simply using something like:
const counters: NodeListOf<HTMLButtonElement> =
  document.querySelectorAll(".counter");

counters.forEach((counter) => {
  hydrateCounter(counter);
});

function hydrateCounter(counter: HTMLButtonElement) {
  let count = 0;
  counter.addEventListener("click", () => {
    count++;
    counter.textContent = `${count}`;
  });
}
Typically if you are going through the trouble of establishing state, it is because you have multiple UI states and the checking of those states is tricky. For example, consider something like accordions on a page, but we only want one open at a single time.
<div class="accordions">
  <div class="accordion">
    <button class="accordion-header">Accordion 1</button>
    <div class="accordion-content" style="display: none">Content 1</div>
  </div>
  <div class="accordion">
    <button class="accordion-header">Accordion 2</button>
    <div class="accordion-content" style="display: none">Content 2</div>
  </div>
  <div class="accordion">
    <button class="accordion-header">Accordion 3</button>
    <div class="accordion-content" style="display: none">Content 3</div>
  </div>
</div>
function hydrateAccordionContainer(container: HTMLDivElement) {
const accordions: NodeListOf<HTMLElement> =
container.querySelectorAll(".accordion");
const activeAccordion = useState<null | HTMLDivElement>(
null,
() => {
if (activeAccordion.value) {
const content =
activeAccordion.value.querySelector(".accordion-content");
content.style.display = "block";
}
},
() => {
if (activeAccordion.value) {
const content =
activeAccordion.value.querySelector(".accordion-content");
content.style.display = "none";
}
},
);
function hydrateAccordion(
accordion: HTMLDivElement,
setActiveAccordion: (accordion: null | HTMLDivElement) => void,
) {
const button = accordion.querySelector("button");
button.addEventListener("click", () => {
if (activeAccordion.value === accordion) {
setActiveAccordion(null);
return;
}
setActiveAccordion(accordion);
});
}
accordions.forEach((accordion) => {
hydrateAccordion(accordion as HTMLDivElement, activeAccordion.set);
});
}It’s definitely possible to do this without the use of in-memory state like we’re doing here, but this defines a rigid local reactivity to build around.
You may also wonder what the advantage of defining this seperate context even is. So far, what we’ve built is about as effective as just defining a state variable and just updating it when we write functions. As we go along, we will introduce more logic that will make encapsulation nicer. For now, you just have to trust me.
Next time we’ll discuss building context stores similar to React’s or Svelte’s to share page state and site state across the client.